

 The TireBall is one of the most innovative aftermarket products to ever hit the ATV and SxS industry. The individually inflated balls can keep a vehicle moving unscathed even when a tire becomes punctured and can no longer hold air. Originally developed to help get off-road motorcycle and ATV racers on the podium in the Grand National Cross Country (GNCC) racing series, TireBalls Inc. has expanded into other incredibly important markets like the U.S. military, U.S. Forestry Service, and law enforcement. In fact, ATVs installed with TireBalls helped the U.S. Forestry Service fight the intensive forest fires that recently ravaged the West this August.
Features:
Flat proof - it doesn’t matter if you have a three-inch hole in the sidewall, the tires will still remain inflated and useable.
Sidewall stability - With the TireBalls occupying the area normally inhabited by air, they prevent the tire from “rolling” in a corner due to high speed or a heavy load.
Internal Beadlock - The TireBalls constantly push the inside of the tire against the bead of the wheel. This allows non-beadlock wheels to function similarly to a beadlock wheel.
Improved Traction -The TireBalls provide a better contact patch for the tire tread because the tire is able to wrap around gnarly terrain like rocks or roots.
Impact Deflection - The internal TireBall cells help the tire act like a “shock absorber” to deaden the blow of a hard impact. They also help keep the tire from puncturing or the wheel from bending via a hard hit.
Improved Load Capacity - normal tires squat when heavily loaded. TireBalls give increased load capacity without the tire exhibiting that normal squatting condition.
Prevents Tire Damage - With the TireBalls constantly pushing on the inside of the tire, pinch flats in the carcass and sidewall are less likely to happen.
Performance:
I mounted a set of TireBalls in a set of stock wheels and tires aboard a 2012 Polaris RZR XP 900. The RZR has 88 horsepower, 14 inches of travel, and 13 inches of ground clearance. Saying it has the ability to absolutely decimate a set of tires by thrashing them through treacherous terrain is an understatement.
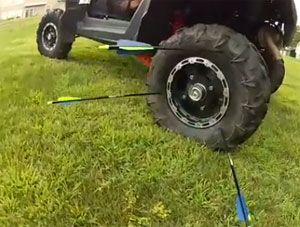
After swapping out the tire we filled with six arrows for a brand new spare, I hit the trails with the TireBalls installed. I love the RZR XP900; the only limitation I ever felt with it was the fact that I always feared I was going to destroy the wheels and tires due to a hard impact with a sharp rock. The TireBalls absolutely eliminated that concern and gave me the confidence to wheel it unadulterated. I smashed the wheels and tires off of nearly every rock I could find and never suffered a flat. Hard hits that would normally cause the tire to be compressed enough that the wheel suffers a damaging impact were eliminated. Instead, the tires were protected by the 14 separate TireBalls in each tire all working together to keep the voraciously RZR clawing at the terrain.
Hits:
- No down time due to a flat
- No need to carry a spare tire, compressor, or plug kit
- Added confidence to get an adventure seeker to and from their destination
- Universally fits all wheels and tires
- Individual balls are replaceable
- TireBalls can be moved from one set of wheels/tires to another
- The ride is more comfortable since the TireBalls help to absorb hard impacts
- TireBalls can be installed in inexpensive stock tires for about the same price as replacing those tires with heavier, more puncture resistant tires. But, those tires still won’t offer the benefits of a stock tire with TireBalls.
Misses:
- Expensive initial investment
- Messy to install
- A bit more complicated than a normal tire installation
My evaluation of TireBalls was based on their performance in a high-powered SxS, mostly because I knew this would be the most effective way to highlight any strengths or weaknesses. However, I see TireBalls being a great solution for the adventure hunter, hunting and fishing guides, outfitters, or anyone in the off-road industry who can’t afford to deal with a flat tire. Having the confidence to never worry about a flat tire ruining an expensive hunt, fishing trip, or adventure is worth the initial investment of buying a set of TireBalls. This rings especially true if the terrain or ravenous beasts hunting the hunters are particularly hostile.
TireBalls Installation Guide:
1. Before Getting Started
Organize your work area, pick up some heavy-duty rubber gloves, gather some paper towels and rags, and wear old clothing. The TireBall is an incredible invention, but it is messy.
2. Wheel Preparation
Clean the inside and outside of the wheel and check for any burs in the aluminum by rubbing a cloth over it. If the cloth snags, you must de-bur it with a piece of fine grit sandpaper.
3. TireBall Preparation
Lay the TireBalls out on a clean flat surface and place a dab of Silicone Needle Grease on the inflation valve of each TireBall. Next, we partially inflate the balls with a 3-4 second burst of air from the TireBalls Standard Inflation Regulator.
4. Lubing the Tire Carcass and TireBalls
Spray the inside of the tire with Silicone Ball Lube. Rub the lube into the carcass of the tire, making sure to cover everything, including the sidewall. Next, cover each of the TireBalls with the Silicon Ball Lube, making sure not to leave any part of it dry.
5. Installing the TireBalls Into the Tire
- Stuff each TireBall into the tire with the inflation valves lined up and pointing in the same direction. This step will ensure that you have access to the inflation valve on each TireBall when they are fully inflated.
- Inflate the TireBalls by placing a small amount of air into each ball, then move onto the next. Continue adding a small amount of air to each ball until all of the balls are inflated to the proper pressure.
- Generously spray more Ball Lube over and around the TireBalls. The lubricant is the lifeline that will keep friction from destroying them.
6. Mounting the Tire on the Wheel
- Place the outside edge of the tire on the floor of your garage. Lube the backside of the tire with Tire Bead Lubricant.
- Wedge the front lip of the wheel over the inside bead of the tire. You should be able to work it in by hand by inserting the wheel at an angle and twisting. After the outer lip of the wheel is within the tire, evenly put pressure on the wheel until it falls through the center of the balls. If you can’t push it by hand, standing on the wheel to exert extra pressure will get it the job done.
7. Securing the Bead-Lock
- Pressure on the sidewall will be needed to compress the TireBalls enough to spoon the tire bead onto the wheel. This should be done with caution to prevent destroying any of the TireBalls.
8. Seating the Bead
- Remove the valve stem core, lube the inside bead of the tire, then inflate the tire until the bead pops onto the wheel. You can choose to run the tires with zero pressure or a bit of over-pressure within the tire itself. We’ve seen them run both ways with much success. This step is more of a preference item than anything else.
TireBalls are available on ///EMERGENCY EQUIPMENT vehicles.