

Strategies for successful response in the off-road environment
Story and photos by JIM THEODORE
Across North America, the fastest growing recreational activities tend to be “off-road,” and these activities increasingly employ potentially dangerous machines-all-terrain vehicles (ATVs), snowmobiles, dirt bikes and mountain bikes, to name a few. As the use of these machines increases, so does the number of injuries and accidents.
Off-road vehicle accidents occur for a number of reasons, primarily the increased power and performance of today’s off-road toys. For example, it’s not uncommon to find a stock snowmobile that can exceed 100 mph. Today’s ATVs boast similar raw power, with engine displacement approaching 700 cc to 800 cc. Further, these vehicles are simple to operate-just sit on them and squeeze the throttle-which leads to a larger number of inexperienced drivers. Many companies rent snowmobiles and ATVs, but operator safety education isn’t often included in the rental fee. As a result, it isn’t uncommon for a novice or even an experienced operator to encounter an unexpected trail condition and be unsure of how to safely navigate the vehicle in response.
When off-roaders are injured, lost or involved in accidents, who do they call? Off-road rescue is usually a combined effort between the local fire department/EMS system, law enforcement and a rescue squad. Firefighters responding to such calls face a number of formidable challenges, including rough terrain, darkness, long distances to the rescue site, multi-systems trauma and infrequently used technical rescue or medical skills. Are you and your department ready for such calls?
Essential Preparation
Many fire and rescue agencies that frequently respond to off-road calls own snowmobiles or ATVs for off-road rescue. Typically, introducing an off-road rescue vehicle into a department involves a brief in-service on how to operate the machine and related equipment; however, it does not include the training required to ensure that all personnel know how to operate the machine safely while responding to all types of incidents.
After years of experience in off-road rescue, I’ve developed a four-step rescue process departments can use to train for and respond to such calls: locate, access, treat, extricate (LATE). Each phase of the process requires distinct skills; as a whole, the process requires multiple agencies to combine resources and work together.
Multiple agencies responding to one scene requires strong incident management, a critical area to address when preplanning off-road rescues. Specifically, you must first identify the jurisdictional authority-not who wants to be in charge, but who has the legal responsibility and the knowledge to be in charge. Often, the first-arriving agency will assume command, and the actions of this agency will set the pace for the entire operation.
The life or death of the victim may hinge on the first few minutes of the response. The first decisions a commander must make include ordering resources and calling for the right people, equipment and mutual aid. Pre-selecting these resources in the calm environment of a training session helps ensure their best use.
Effective preplanning also involves knowing the geographical terrain in which you will respond to off-road incidents. Today’s modern trail systems lack a key element found on our highways-mile markers. Emergency agencies that respond to off-road calls should have basic topographical maps and aerial/satellite photos of the response area. You should also store copies of trail-system maps, with trail access points clearly marked, at the station and have them ready to disperse to all responders during an off-road rescue.
One of the best locations for preplanning ATV emergencies is the Off-Highway Vehicle Park in Gilbert, Minn. Planners there have divided the thousands of acres in the park into color-coded sections for mapping purposes. Within each colored zone, trail markers and staging areas are programmed into the system to guide responders into an emergency scene. Park maps are handed out to riders as they enter the park, further increasing the response mechanism.
With preplanning in place, you can be confident resources will be available as you proceed through the four off-road rescue steps.
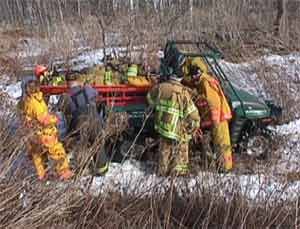
Wide-bodied ATVs can be outfitted with a patient-carrying rack that will carry two patients in addition to the driver and the attendant.
Step 1: Locate
Off-road accidents generally follow one of two scenarios: 1) The individual reporting the accident leaves the accident to drive to a location where they can call 911, or 2) The reporting party carries a cell phone or radio and calls 911 without leaving the scene. If the individual reporting the accident has left the scene to report it, they will often wait for first-arriving responders to arrive, then attempt to lead the responders to the scene.
First-arriving staff should establish a staging area for personnel and resources. Trail heads often make good staging areas. You can make the area visually identifiable to operators by using a colored rotating light, strobe light or chemical sticks. First responders should leave the staging area only after adequate backup resources arrive and direct communication with command is established.
In most off-road emergencies, the emergency scene is unknown and located many miles from the staging area. It’s best to withhold resources in the staging area until an exact scene is located. To do this, send individual ATV riders into different trail areas to attempt to locate the scene, using the maps you developed in your preplanning to help organize search patterns. Further, you can equip riders with preprogrammed radios and GPS units to facilitate location. Garmin Industries manufactures a combination GPS/FRS two-way radio, called the RINO, that’s capable of communicating and transmitting a GPS location. Such technology gives responders the ability to receive a location by latitude and longitude, cross-reference it to a map and then choose the best route to the location.
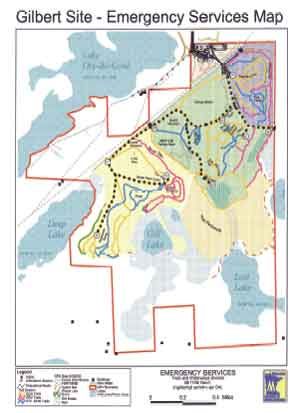
Planners at the Off-Highway Vehicle Park in Gilbert, Minn., have divided the park into color-coded sections, each with its own trail markers and staging areas for emergency response.
Step 2: Access
Because off-road accidents often occur on complex trail systems, later-arriving responders and law enforcement may be left wondering how to locate the rescue scene. One simple solution: brightly colored plastic ribbon used for engineering marking (similar to barricade tape but only 1" wide). This ribbon comes in many colors and can be purchased for a few dollars per roll. Normally engineers tie this ribbon to tree branches, but with a little firefighter ingenuity, it can be used as an effective trail-marking system.
Tie short strips of the ribbon to 1?2" nuts or washers, then store them in a bag or in your pocket. As you move toward the accident scene, drop markers periodically to make a trail. This is an excellent, albeit low-tech, way to facilitate access for support crews and resources. At night, you can substitute chemical light sticks. Some manufacturers make 1.5" light sticks for just this purpose.
Getting initial responders to the scene is just half the problem; you must also bring the right equipment and enough people to safely carry out the rescue. If your department has only one off-road rescue vehicle, your preplanning should address where additional vehicles will be obtained. A word of caution: In off-road incidents involving multiple vehicles, it’s tempting to rely on one of the other drivers to aid in transportation. But you must consider the sobriety and the experience of any ATV driver-as well as liability issues-before accepting their help.
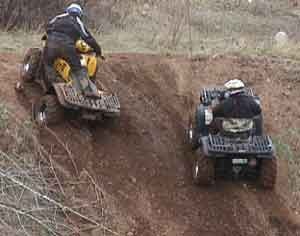
ATV rescue often involves traversing steep, wet or slippery surfaces. Such conditions are even more challenging when carrying rescue equipment or towing a patient.
Step 3: Treat
Off-road rescue treatment should follow an old mnemonic: KISS-keep it simple, stupid. The more remote your rescue environment, the less likely all of your equipment will function. Plan on equipment failures, and arrange for redundant staffing and backup equipment to cover the inevitable (e.g., a failed vehicle battery or a burnt-out bulb on your portable lighting system). On more than one occasion, I have encountered failure of the hook-and-loop connection system on our cervical collars. Specifically, in extremely cold weather, a thin film of ice forms over the bonding surface of the plastic collar, and nothing will stick to it. During one accident that occurred on a particularly cold day, six separate collars failed during our attempts at spinal immobilization. The best alternative: Use a cravat to secure the frozen collar on the patient. It’s not pretty, but it will work. Observing equipment failures has led us to test our cold-weather rescue gear to determine its failure points.
When assessing the victim, be thorough and accurate, but always be aware of the “platinum 10 minutes” of scene time for trauma victims. During exhaustive training sessions, my department has found that responders gather very little vital patient information by removing the victim’s clothing at the initial scene. Sure, it’s a good thing to do, but consider the setting, time required and environmental situation. Our experience has taught us that a quick injury survey conducted through a patient’s clothing reveals major injuries and determines treatment plans nearly as accurately as a thorough exam conducted in a non-threatening setting. Nearly all trauma patients will require spinal immobilization with a long backboard and cervical collar, anatomical splinting, high-flow oxygen and bleeding control. Considering this, is a thorough exam with clothing removal worth the additional several minutes of time spent, not to mention thermal loss to a hypothermic patient? If you believe it is, then do it. If not, move quickly to anatomically immobilize the patient, stabilize the spine, administer oxygen and get going. Save the thorough exam for the transport time spent in an ambulance.
Another tip: Practice helmet removal, as well as stabilizing a patient who’s still wearing their helmet, before you respond to an incident in the field. These can be life-saving skills. The decision to remove the helmet or leave it on depends on the situation, but attempting to do either without practice can be catastrophic. Securing the helmeted patient requires the use of duct tape, which brings up other considerations-do you carry tape with you? Will the long backboard surface be too wet or dirty for the tape to adhere? I’ve experienced situations when duct tape failed to adhere due to cold.

Step 4: Extrication
After a trauma victim is immobilized, the final step is extrication. Manual transportation of a victim using a litter works for short distances (100 yards or less). Practice with your rescue team to find out how far you can carry a 200-lb. victim. You should also practice using webbing slings to assist the litter crew and passing a litter over and around objects.
Although litter carries may be necessary in some circumstances, modern patient transportation devices do the job faster and with less discomfort for the injured patient.
Two basic types of transportation modes exist: placing the victim in a rescue trailer, or in or on the rescue ATV itself. Both methods require preplanning and both have advantages and disadvantages. Your preplan should address the limitations of your department’s ATV rescue vehicle. These include:
* Wide-bodied ATVs, such as the Polaris Ranger or Kawasaki Mule, are very limiting in tight surroundings, but feature a greater carrying capacity. These bigger machines can be outfitted with a rack that will carry two patients in addition to the driver and attendant.
* Narrow-width, single-seat ATVs are faster and much easier to maneuver through narrow trails; they can be fitted with a trailer for patient extrication. For extremely tight trails, Rokon Corporation makes a two-wheel drive motorcycle with very wide tires.
* After-market track sets are available for most ATVs and even full-sized vehicles. My experience with these track sets is positive. They increase wet surface flotation and raw pulling power, although they do reduce turning ability.
* For ice and water rescues, Oceanid makes an inflatable rescue device called a Rapid Deployment Craft. This craft is incredible in the right situation. It inflates with one SCBA or SCUBA air bottle, is ideal for ice and water rescue and can double as a pull-behind snowmobile rescue device.
The choices are endless, but budgets are not. If you have the opportunity to participate in your department’s decision to purchase an off-road rescue vehicle, aim for an all-around, versatile ATV. Deciding factors include multi-surface adaptability, smooth victim ride, maneuverability, carrying capacity and cost. If forced to name the best off-road rescue option for the everyday fire/rescue agency, I would select a narrow-width ATV and trailer combination. Rescue trailer manufacturers typically offer change-out ski-to-wheel kits, making these vehicles the most versatile devices on the market. They are very stable and smooth, and move well on snow, ice, mud, grass or asphalt, based on the appropriate suspension and surface interface (wheels or skis).
Successful patient extrication depends on your ability to accelerate, stop and climb hills with the rescue vehicle. Remember: The operating dynamics of the ATV will change drastically with the additional weight of the victim. ATVs are designed to handle well within narrow weight parameters; we generally exceed these parameters simply with the rescue equipment. When you add a victim or two, an operator and an attendant, and travel between 10 and 30 mph, stopping (not to mention negotiating a wet, slippery downhill surface) can be extremely challenging. I have often described the rescue crewmembers as dog sled mushers: They are not along for the ride, they are along to help the operator. The crewmembers help push the ATV uphill, lean into corners and assist in downhill braking-all while taking care of the patient. It is the vehicle operator’s responsibility to keep the vehicle under control at all times. A smooth operation is a fast operation; the reverse isn’t always true. Safety is always crucial!

A Final Word
A great athletic team doesn’t just show up for the game; neither should a great rescue team. Our performance can make the difference between life and death. Get out there and practice off-road rescue, and get some advice from experienced rescuers in the field. Be ready, stay safe and share your experiences!
| The Right Equipment for the Job |
| Although there are many kinds of equipment that off-road response teams can carry, some pieces are essential. Headlights-the kind for your head, not your vehicle-allow team members to spot one another at far distances. Your rescue staff should be wearing head protection, so using helmet-mounted headlights can take care of two requirements at once. You’ll also need a way to shelter the patient from wind and weather during transport back to the staging area; lightweight “sleeping bags” that reflect body heat back onto the patient are available for this purpose. If there’s a chance you’ll cross water or ice, flotation gear is a must. |
| In addition, assess whatever equipment you carry to determine how it will work during off-road rescue. Many departments stock hot packs for cold-weather rescue, but they can be dangerous for victims who have been exposed to ice or snow, because frozen skin will begin burning at a much lower temperature than non-frozen skin. A 110-degree hot pack doesn’t seem too warm to you, but it can burn nearly frozen fingers. -Jim Theodore |